I think you mean how to write a blog post. Well, I can explain how I am writing this blog post and then you will know how to write a blog post – on a blog site with a WordPress theme, anyway.
Even though I could have first written this blog post offline, on my computer using notepad or Microsoft word, I sometimes write my blog posts directly into the area for a blog post, within my WordPress dashboard – like I am doing right now.
Only when I am finished writing this blog post will I publish it so that people who visit this blog (you) can then read it.
So, what did I do to get here so that I could start writing?
How to Write a Blog Post
I used the link to my WordPress dashboard, filled in my username and password, and logged in.
Down the left hand side of my WordPress dashboard there is a long thin column. I can see it right now as I write this.
I scrolled my mouse cursor down to the heading that said “Posts” and clicked it.
Below the heading “Posts” 4 more headings appeared. I can still see them now.
The 4 headings are: All Posts, Add New, Categories and Tags.
I’m going to take a screenshot after writing the next two paragraphs.
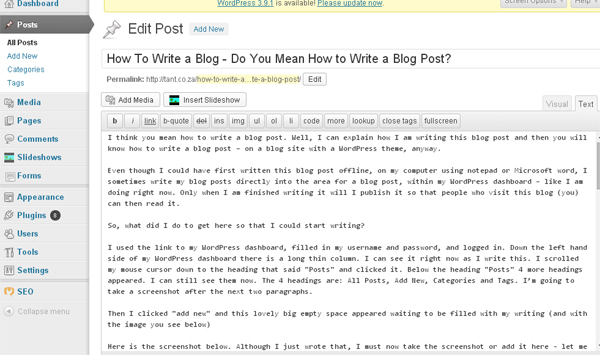
Then I clicked “add new” and this lovely big empty space appeared waiting to be filled with my writing (and with the image you see below)
Here is the screenshot below. Although I just wrote that, I must now take the screenshot or add it here – let me go do that now!
Here it is!

how to write a blog screenshot
How did I add the image above to this blog post?
If you have a look at the image which is basically of the content of this page (or blog post!), you will see the words “Add Media” at the top left of the writing toolbar. I first clicked onto my page here where I wanted the image to appear, then I clicked the little camera picture next to the words “Add Media”.
A window opened where I could “select a file”, and I clicked the “select a file” and went to find the image in my computer files. Once I had found the image that I had already resized smaller to use in this blog post, I clicked “open” and it uploaded to the media library in my WordPress dashboard on this site.
I then filled in the fields where I could add a description (that you can see if you hover your mouse cursor over the image), a caption (that you can see directly beneath the image), and chose that it be centrally placed on the page, and that it be its full size, not medium or a small thumbnail sized. Then I clicked “insert” and it appeared here in my dashboard. When I save and publish this post, (which I will of course have already done because you are reading this right now) you will see the image too.
Just now I checked that this page is going to look okay to others after I have published it. How did I do that?
For me to view and check this page before I publish it for all to see, I first clicked “Save Draft” (you can’t see that in the screenshot image above – but it is just below the space for all this text) and then I right clicked “Preview” (on the other end of the page in line with the “save draft” and selected open in a new tab. Then I went to that tab to view this page to see how it would look to people reading this page (you.)
It is good to preview a page (or post) before you publish it so that you can see if it is appearing as you would like it too. Maybe you think you need to split a long paragraph into two or three paragraphs or something, and you can do it before you publish the post, by making your changes and clicking “save draft” and checking in the other tab again if you’re happy – refresh that preview page each time you make a change and save your draft, if you want to view the effects of the change you’ve just made to your page in your dashboard.
Of course you can always come back and edit the post later, but it’s nice to get things looking right, right away.
I have also ticked off that I want this blog post to appear in the category “blog” and the category “writing” – you choose your category (or add a category your post can go into if your blog is still new) in an area for it beneath the main text area (beneath this area – but you can only see it if you are in your dashboard).
Although search engine spiders may find this post and index some of the words, I help that along by also filling in the meta title, meta description, and meta keywords in the SEO plugin area I see beneath this post in my dashboard.
Very soon, I am going to click the blue “publish” button and then this blog post will be live on the site for all to see.
How will people see this blog post? Well, how did you get here?
How to write a blog? Do what I did and explained above, and write about anything – explain something (like I just did) or write about your day or about something that you are interested in. Just write!
You have not only learned how to write a blog post on a WordPress blog site, but have also learned how to insert an image into a blog post. Now, start a blog of your own, and soon you may be able to tell others, in your own words, how to write a blog post too!
© Copyright Teresa Schultz 2014


